Quickstart
This section provides a demonstration of the capabilities of FactoryTX. You will configure the three major components of FactoryTX to initiate data acquisition from two different data sources. You will be using the FactoryTX UI for all the configuration requirements. You will also need access to a Sight Machine cloud environment if you want to see raw data transmitted to the platform (ask your Sight Machine contact for details). The guide uses sample data from an imaginary manufacturing startup that specializes in safari park vehicles. Given the nature of modern auto manufacturing, the supply chain is distributed all over the globe and raw data is stored in the cloud. The data is stored using two services, each with data related to different manufacturing processes. FactoryTX will be configured to collect data from an MS SQL Server and an Azure Data Lake, apply some light data transformations, and upload data as records to a Sight Machine cloud instance.
Steps that we will walk through:
Getting an API key
FactoryTX and the Sight Machine Manufacturing Analytics platform (MA) use secure authentication to verify the identity of the raw data source. In order to initiate the data upload process, an Edge API key will need to be generated and saved to the FactoryTX configuration.
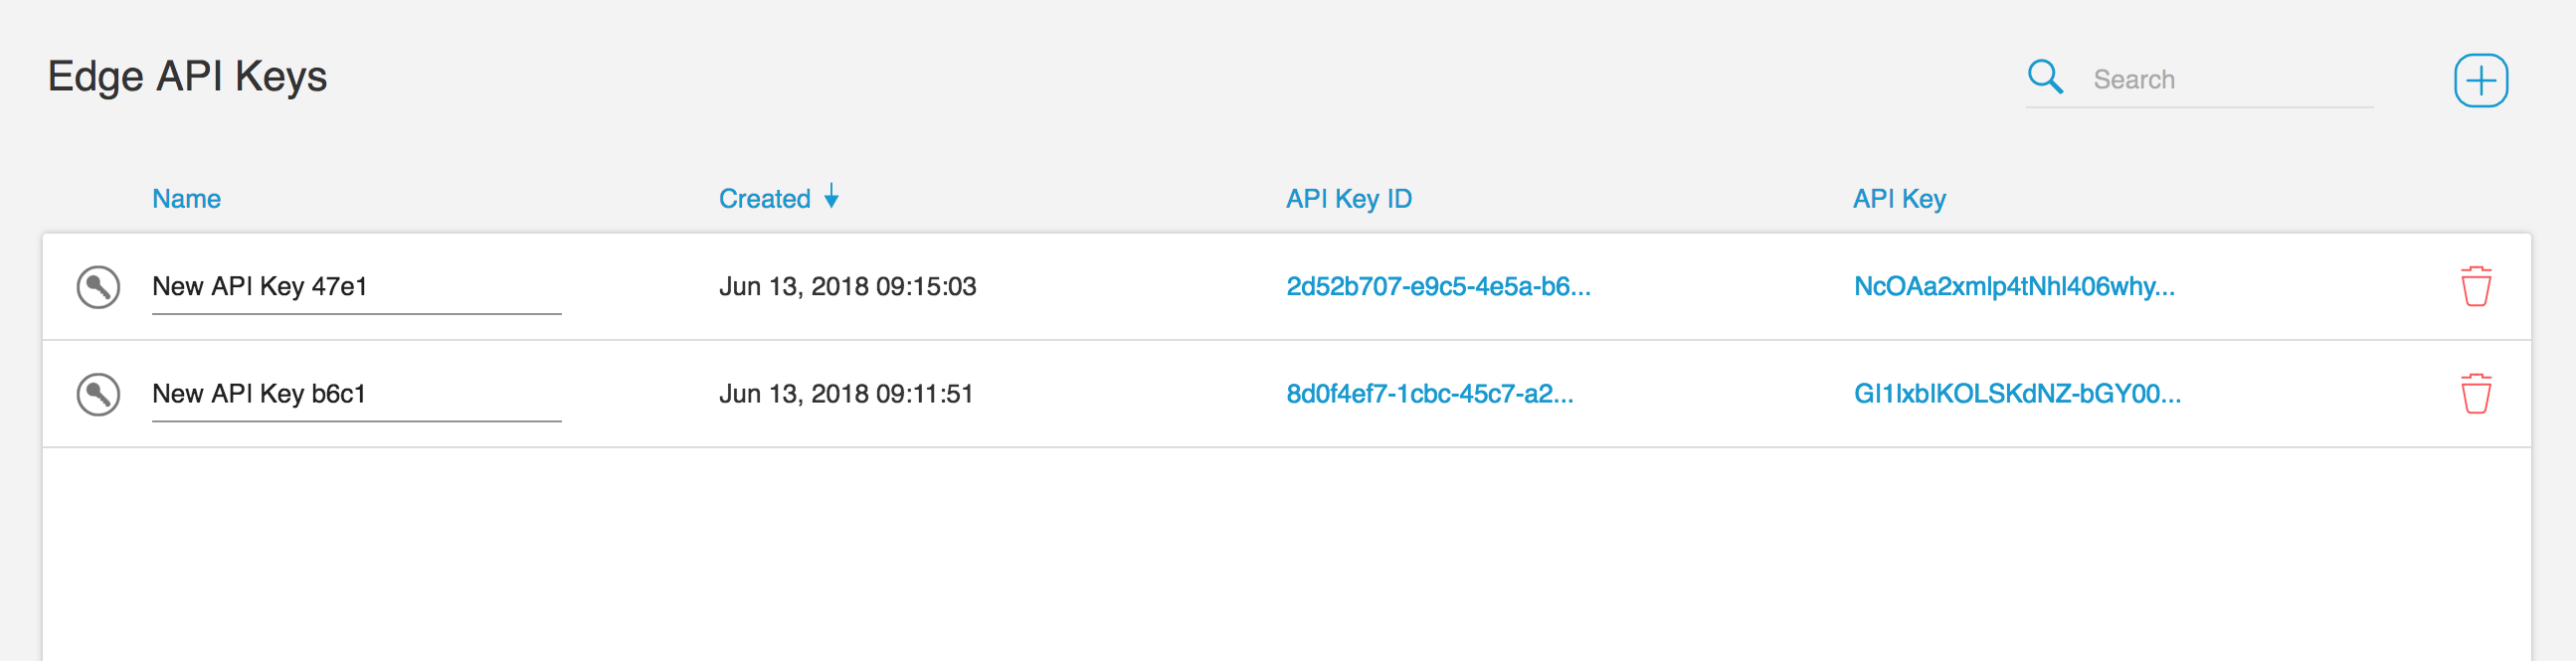
Edge API keys are created and managed in MA. To view and manage them, navigate to your MA web UI in a browser.
Select Factory CONNECT from the Platform navigation menu
A list of Edge API keys will be displayed in the table. To create a new key, select the + icon in the upper right corner of the UI.
Running FactoryTX
There are a few ways to run FactoryTX:
locally with
docker-compose;on an appliance (IPC) managed by Sight Machine;
on a FactoryTX Virtual Machine (VM) managed by Sight Machine;
in Kubernetes (i.e. FactoryTX Cloud)
If you don’t have access to a working FactoryTX installation, please refer to the guide on setting up Local FactoryTX with Docker Compose.
Otherwise, please navigate to the FactoryTX Configuration Editor.
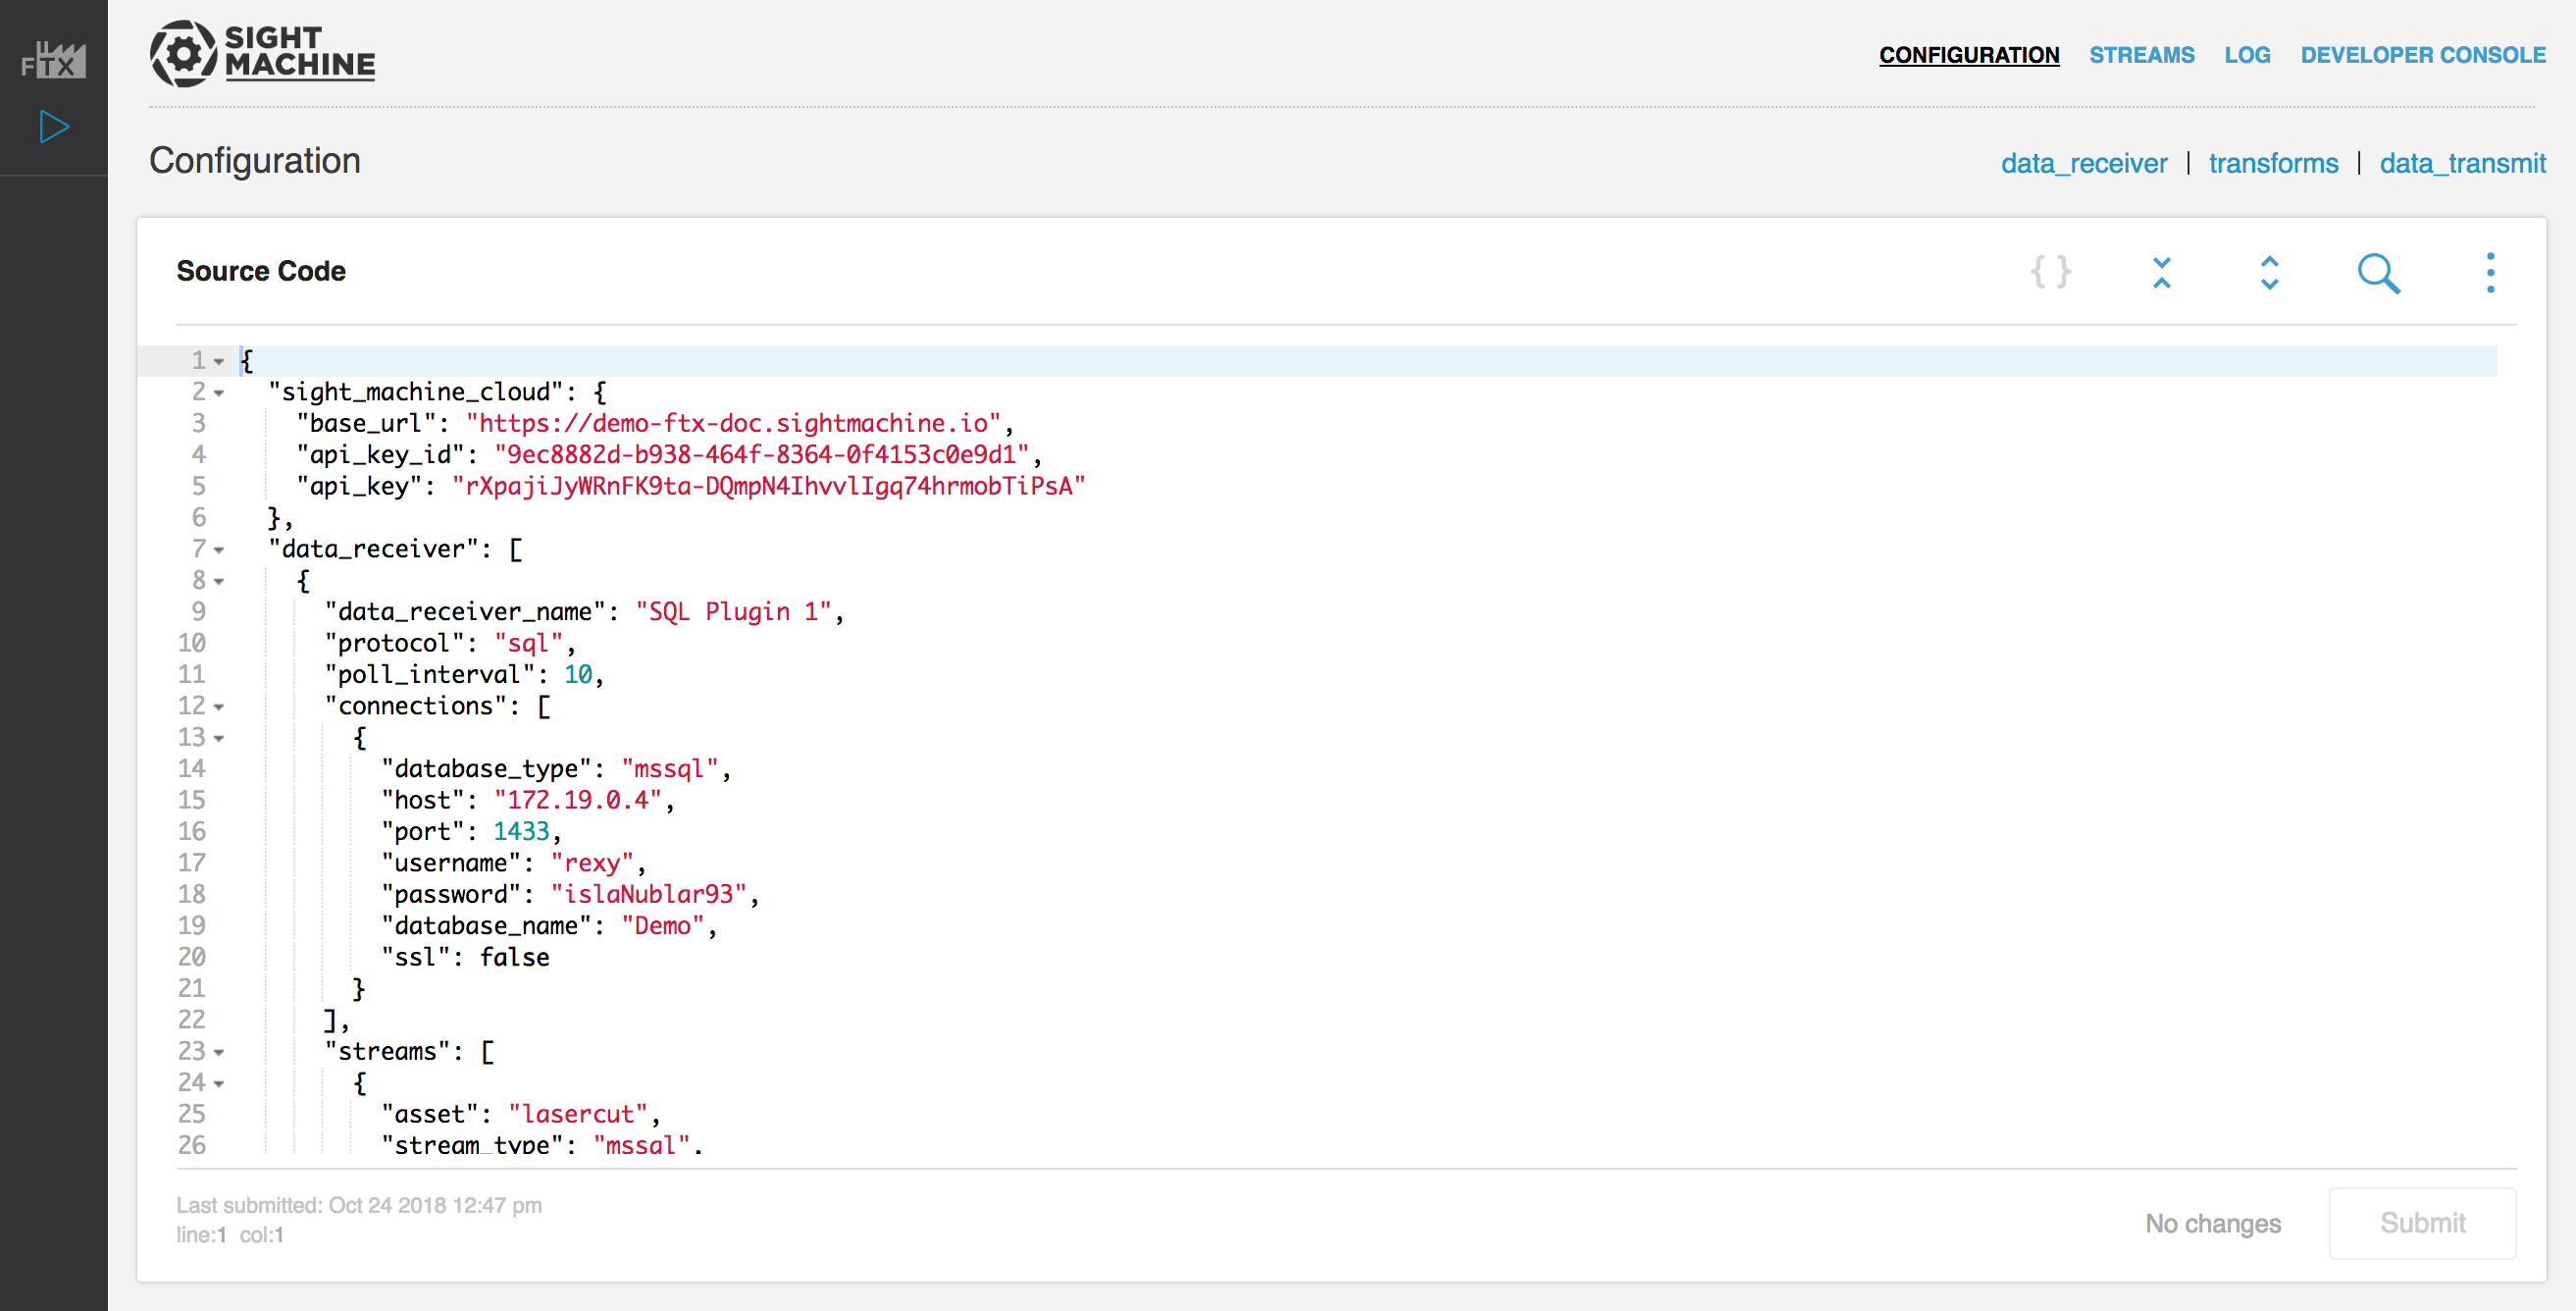
Configuring FactoryTX
In the Configuration Editor, replace the existing configuration with the following configuration:
  1{
  2  "data_receiver": [
  3    {
  4      "data_receiver_name": "SQL Plugin 1",
  5      "protocol": "sql",
  6      "poll_interval": 10,
  7      "connections": [
  8        {
  9          "database_type": "mssql",
 10          "host": "35.233.132.166",
 11          "port": 1433,
 12          "username": "rexy",
 13          "password": "islaNublar93",
 14          "database_name": "Demo",
 15          "ssl": false,
 16          "connection_name": "Nedry"
 17        }
 18      ],
 19      "streams": [
 20        {
 21          "asset": "lasercut",
 22          "stream_type": "mssql",
 23          "state_fields": [
 24            {
 25              "column_name": "timestamp",
 26              "data_type": "timestamp",
 27              "initial_value": "2018-10-22 10:29:00"
 28            }
 29          ],
 30          "query": "SELECT * FROM ca_lasercut\nWHERE timestamp > :timestamp\nORDER BY timestamp;"
 31        },
 32        {
 33          "asset": "diecast",
 34          "stream_type": "mssql",
 35          "state_fields": [
 36            {
 37              "column_name": "TIMESTAMP",
 38              "data_type": "timestamp",
 39              "initial_value": "2018-10-22 12:29:00"
 40            }
 41          ],
 42          "query": "SELECT * FROM hk_diecast\nWHERE TIMESTAMP > :TIMESTAMP\nORDER BY TIMESTAMP;"
 43        },
 44        {
 45          "asset": "fusion",
 46          "stream_type": "mssql",
 47          "state_fields": [
 48            {
 49              "column_name": "timestamp",
 50              "data_type": "timestamp",
 51              "initial_value": "2018-10-22 02:28:00"
 52            }
 53          ],
 54          "query": "SELECT * FROM tl_fusion WHERE timestamp > :timestamp ORDER BY timestamp;"
 55        }
 56      ]
 57    },
 58    {
 59      "data_receiver_name": "azure_receiver_1",
 60      "protocol": "azure_data_lake",
 61      "poll_interval": 5,
 62      "connections": [
 63        {
 64          "tenant_id": "beb1d7f9-8e2e-4dc4-83be-190ebceb70ea",
 65          "client_id": "b8d454e3-67ec-4f2f-8dcb-a5d6f87abbc6",
 66          "client_secret": "BdgGBpZ7pS.Ogf..7PpT0JVLXes.i1uh",
 67          "store_name": "factorytxreceivertest",
 68          "data_directory": "directory-1",
 69          "max_files_per_request": 1,
 70          "connection_name": "Blue"
 71        }
 72      ],
 73      "parsers": [
 74        {
 75          "parser_name": "CSV_Parser_1",
 76          "parser_type": "csv"
 77        }
 78      ],
 79      "streams": [
 80        {
 81          "asset": "spraypaint",
 82          "stream_type": "azure_lake",
 83          "file_filter": [
 84            "*.csv"
 85          ],
 86          "parser": "CSV_Parser_1"
 87        }
 88      ]
 89    }
 90  ],
 91  "transforms": [
 92    {
 93      "transform_name": "Rename 1",
 94      "transform_type": "rename",
 95      "filter_stream": [
 96        "diecast:mssql"
 97      ],
 98      "renames": [
 99        {
100          "from": "TIMESTAMP",
101          "to": "timestamp"
102        }
103      ]
104    },
105    {
106      "transform_name": "Rename 2",
107      "transform_type": "rename",
108      "filter_stream": [
109        "spraypaint:azure_lake"
110      ],
111      "renames": [
112        {
113          "from": "Timestamp",
114          "to": "timestamp"
115        }
116      ]
117    },
118    {
119      "transform_name": "Time Converter 1",
120      "transform_type": "convert_timestamps",
121      "filter_stream": [
122        "spraypaint:*"
123      ],
124      "field_names": [
125        "timestamp"
126      ],
127      "timezone": "Asia/Tokyo"
128    },
129    {
130      "transform_name": "Time Converter 2",
131      "transform_type": "convert_timestamps",
132      "filter_stream": [
133        "lasercut:mssql"
134      ],
135      "field_names": [
136        "timestamp"
137      ],
138      "timezone": "America/New_York"
139    },
140    {
141      "transform_name": "Time Converter 3",
142      "transform_type": "convert_timestamps",
143      "filter_stream": [
144        "diecast:mssql"
145      ],
146      "field_names": [
147        "timestamp"
148      ],
149      "timezone": "Asia/Hong_Kong"
150    },
151    {
152      "transform_name": "Time Converter 4",
153      "transform_type": "convert_timestamps",
154      "filter_stream": [
155        "fusion:mssql"
156      ],
157      "field_names": [
158        "timestamp"
159      ],
160      "timezone": "Europe/Paris"
161    }
162  ],
163  "data_transmit": [
164    {
165      "transmit_name": "MyTransmit_1",
166      "transmit_type": "remotedatapost"
167    }
168  ]
169}
IMPORTANT: You’ll need to configure SM Cloud Credentials with values that you generated in your MA service environment. Please refer to the Getting an API key section for reference on how to create API keys.
In the exemplified configuration file, FactoryTX is collecting data from our international factories from two remote data sources: an MS SQL Server and an Azure Data Lake instance.
The MS SQL Server has three tables in the Demo database that we want:
“ca_lasercut”: The table contains information from 6 laser cutting machines at our factory in Carmel, Indiana. These machines create molds for our car parts.
“hk_diecast”: The table contains information from 3 die casting machines at our factory in Hong Kong, China. These machines pour molten compounds into the molds created by the laser cutting machines.
“tl_fusion”: The table contains information from our 1 fusion machine at our factory in Toulouse, France. The fusion machine assembles the separate parts into the whole car.
The Azure Data Lake instance has CSV files of data from our machines in Tokyo, Japan, which apply a few coats of spray paint to the exterior of our cars.
Before transmitting the data to the Sight Machine cloud, FactoryTX will apply some light data transformations, such as renaming a SQL table column and converting timestamps into the factory’s time zone.
To get more details about the configuration file and what each of its sections mean, please refer to the Receivers and Transforms and Transmits article.
Click the submit button in the FactoryTX Controller to save the configuration and FactoryTX will automatically begin collecting, transforming, and transmitting data to the Sight Machine cloud.